Welcome again to another Logic Apps Best Practices, Tips, and Tricks. In my previous blog posts, I talked about some of the essential best practices you should have while working with Azure Logic Apps. Check out these Logic App tips and tricks!
Today I’m going to speak about another critical Best practice, Tips, and Tricks: implementing Error handling inside Logic Apps.

#6 Error handling… configure run after settings
When designing a business process, one of the most important design considerations you need to keep in mind is what happens when things go wrong. By default, Logic App allows us to handle errors by using the Configure run after settings at a per action level. This is what common programming languages like C# do.
- Line 5 will only be executed if line 4 executes with success.
- Line 7 will only be executed if line 5 executes with success.
- and so on
- If an error happens on one of these lines, the function or program will be interrupted there.
The same default behavior happens on Logic Apps. An upcoming action will run if the current one is successfully finished with success. However, in Logic App we have the possibility to easily change this behavior and, kind of, implement a try-catch per action level.
Changing the default action run after settings
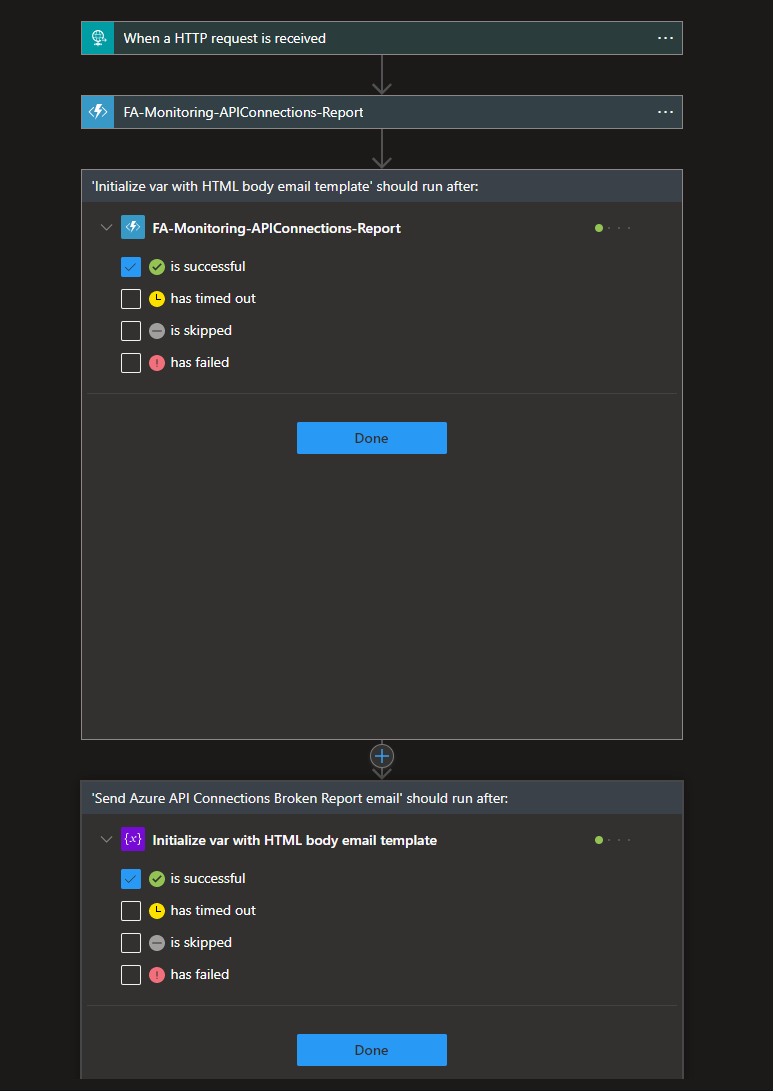
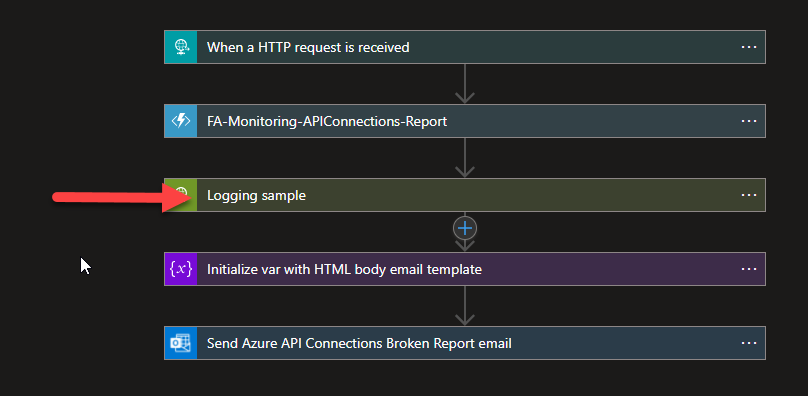
As you see in the picture below, by default the upcoming action will run if the previous one is successfully finished with success:
- Initialize var with HTML body email template action will run if FA-Monitoring-APIConnections-Report action is successfully finished
- Send Azure API Connections Broken Report email action will run if Initialize var with HTML body email template action is successfully finished
And this behavior makes all sense.
Note that you cannot configure the run after settings for the first action, in this case, the FA-Monitoring-APIConnections-Report action because that depends on the trigger execution. And that makes sense.
Now let’s assume that we add a Logging shape to track some information – there are better ways to do this! This is just a POC sample.
Normally these tracking actions shouldn’t break your business workflow if something gets wrong with them, let’s say the service was offline. Should we miss an invoice just because we can’t do tracing or logging? No.
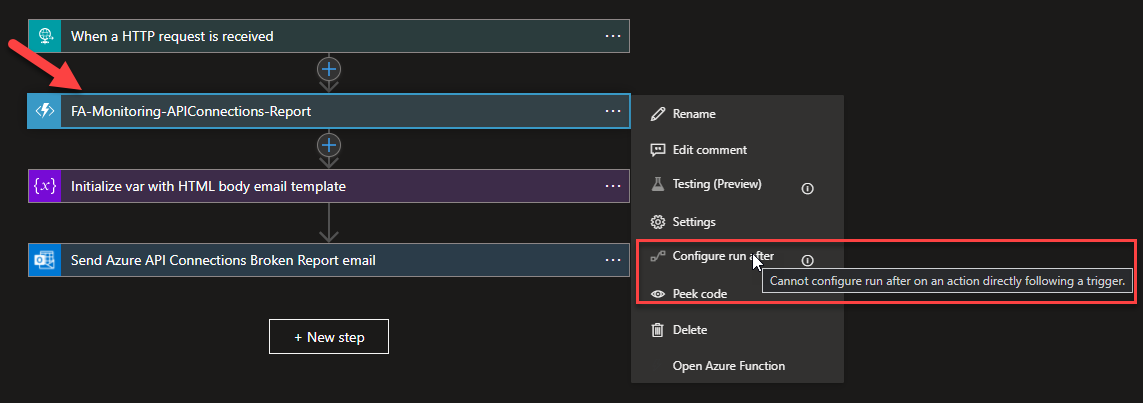
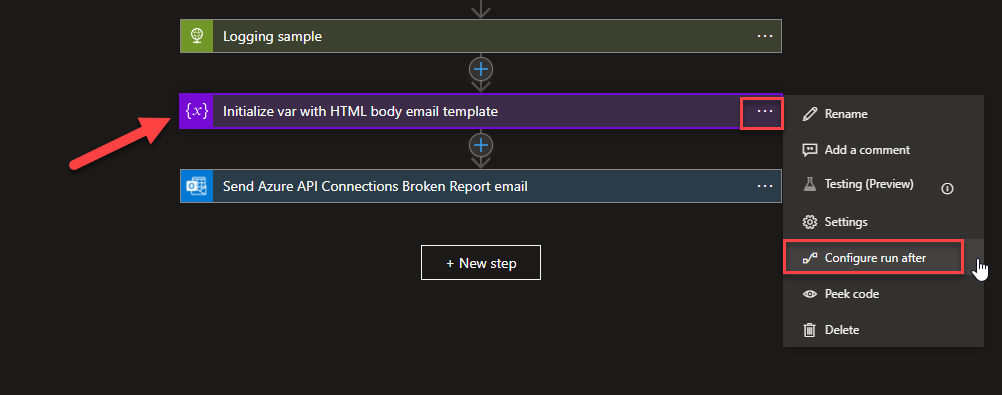
To avoid that we can on the action bellow, in our sample, the Initialize var with HTML body email template action change the default run after setting. And to do that we should:
- On the Initialize var with HTML body email template action, click on the … (3 dots) and select the Configure run after option.
- On the ‘Initialize var with HTML body email template’ should run after, click on the Logging sample to expand the properties and select the following options:
- is successful (by default already selected)
- has timed out
- has failed
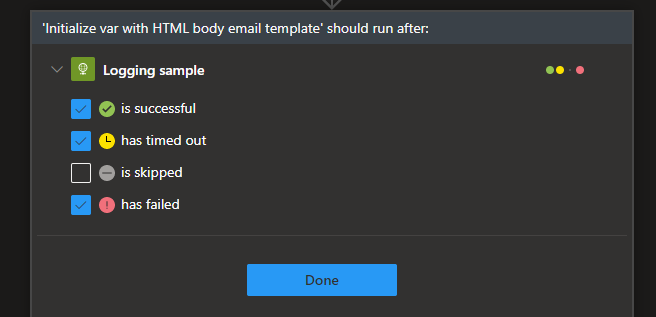
- Click Done.
So now the Initialize var with HTML body email template action will be executed even if the Logging sample action fails, give a timeout, or is executed with success as we expected. The important is that will not impact the critical logic of your business workflow.
And you can apply this strategy to all shapes. Use it carefully and according to your business logic.
This can be perfect for a simple business process, but in more complex or real enterprise scenarios, there will be situations where we want to handle errors from multiple actions in a single place and implement specific tasks if a failure occurs.
Implementing advance Error handling
As I mentioned in #4 Using Scopes, most users tend to think that Scopes is a strange action that is not there to do anything other than to help you organize the business logic a little better inside LA, but that is not true. The reality is that scopes have many functionalities:
- Region statement: the capability to organize your business logic and have specific areas that you can collapse and expand whenever you need it.
- Try-Catch-Finally statement: advance error handling capabilities
And it is this second capability that allows us to implement advanced error handling capabilities by:
- Creating a try-catch statement consisting of a try block followed by one catch clause to handlers different exceptions that can occur on the try block.
- Or creating a try-catch-finally statement.
Once again, this is quite normal on traditional programming languages like C#, where we use a try-catch or try-catch-finally statements:
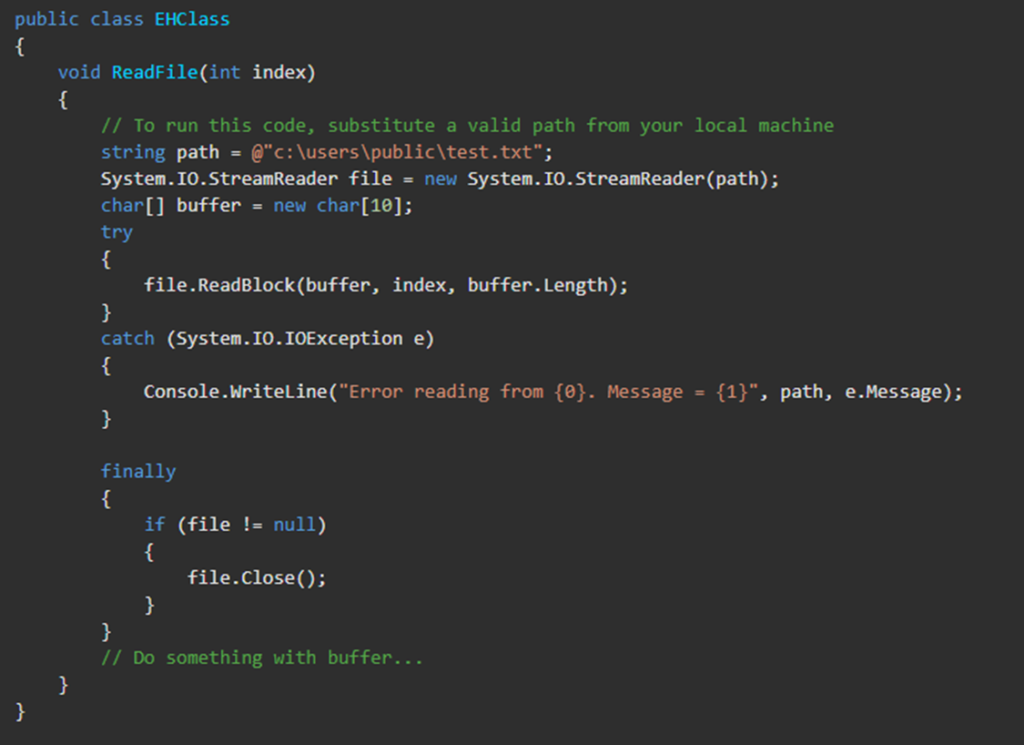
The try-catch-finally statement handles some or all of the errors that may occur in a block of code. Errors can be coding errors made by the programmer, errors due to wrong input, and other unforeseeable things.
- The try statement allows you to define a block of code to be tested for errors while it is being executed –> this will be your Actions inside Logic App that describe the logic of your business process.
- The catch statement allows you to define a block of code to be executed if an error occurs in the try block –> this will be your Actions inside Logic App that your want to run if some failure occurs in the standard actions of your business process.
- The finally statement lets you execute code after try and catch statements, regardless of the result (if there was a fail inside the try statement or if everything was completed successfully).
Note: The catch and finally statements are optional, but you need to use one of them (if not both) while using the try statement.
To implement a try-catch or try-catch-finally statements we need to:
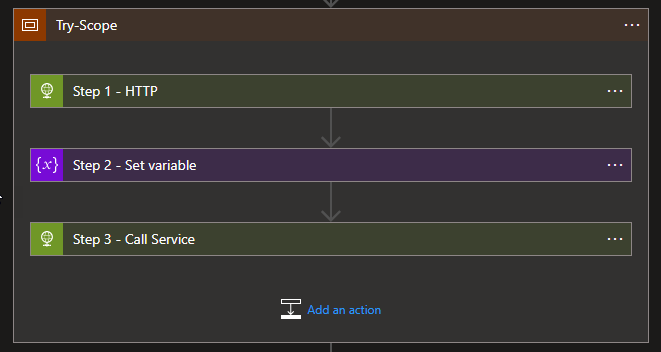
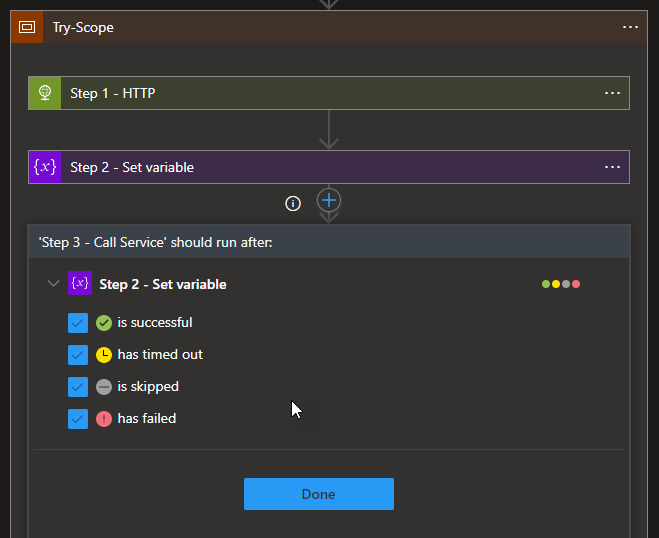
- Add a Scope, we can call it Try-Scope and add all the actions that you want to control errors inside this scope.
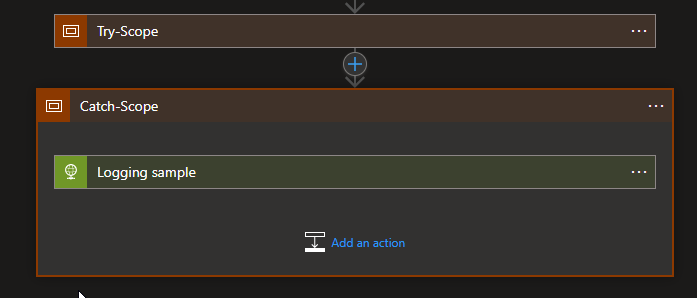
- Just immediately after the Try-Scope action, add a new Scope, we can call it Catch-Scope and add all the actions necessary to perform in case of errors, like rollback actions or logging actions.
- Now on the Catch-Scope action, click on the … (3 dots) and select Configure run after option
- Click on the Try-Scope to present the run after options and select:
- has failed
- has timed out
- note: unselect the is successful option
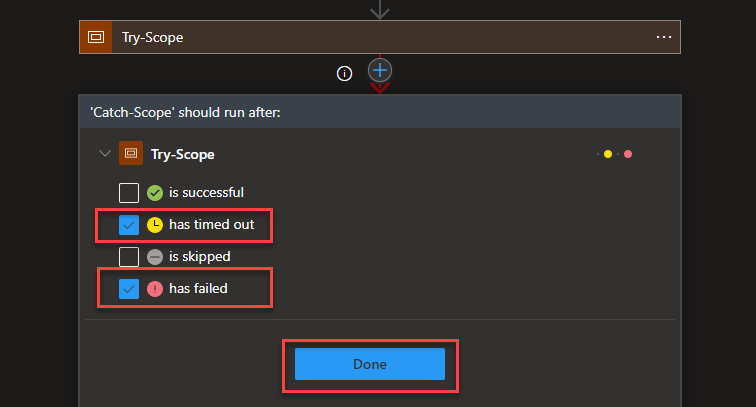
- and click Done.
With this, we have implemented a try-catch statement. Now if we want to implement a try-catch-finally statement we just need to:
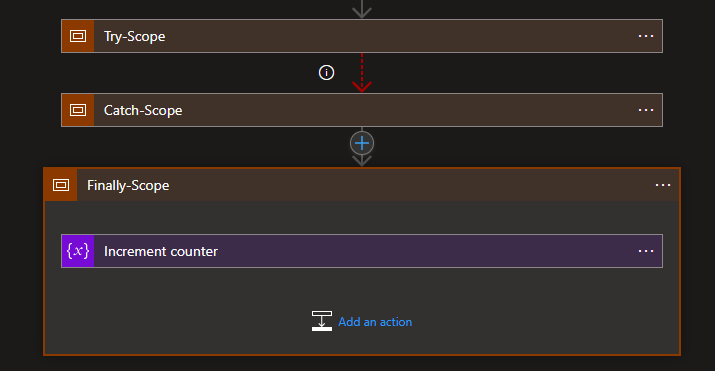
- Immediately after the Catch-Scope action, add a new Scope, we can call it Finally-Scope and add all the actions that will be executed no matter the Try-Scope is executed successfully or if the Catch-Scope is executed.
- Now on the Finally-Scope action, click on the … (3 dots) and select Configure run after option
- Click on the Catch-Scope to present the run after options and select all options:
- is successful
- has timed out
- is skipped
- has failed
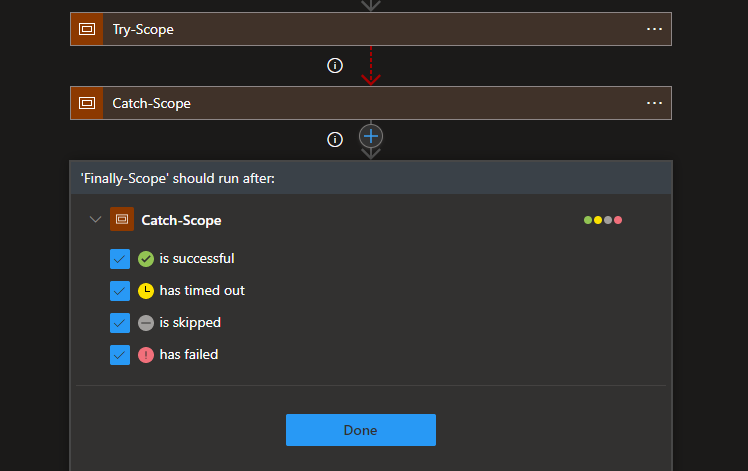
- and click Done.
And there you go we have a try-catch-finally statement implemented.
Important note: Even inside a Scope we can implement kind of, a try-catch per action level that we explain at the beginning of this post.
Stay tuned for the following Logic App Best practices, Tips, and Tricks.