Earlier on this blog, I explain step-by-step how you are able to expose a Logic App through Azure API Management. Today I will address how you will be able to protect your Logic App from improper access, i.e., if we are exposing the Logic App thru APIM we may want to enforce that all the communication to go through APIM and restrict access to the Logic App, for example avoiding direct call to the Logic App (without passing thru APIM)
How to restrict access to the Logic App?
Based on what you can find in Microsoft official documentation, when your logic app uses an HTTP request-based trigger such as the Request or Webhook trigger, exactly the one we need to use in order to be able to expose a Logic App in APIM, you can limit access so that only authorized clients can start your logic app.
You can secure access to this trigger type by using one or a combination of these strategies:
- Generate shared access signatures
- Every request endpoint on a logic app has a Shared Access Signature (SAS) in the endpoint’s URL, which follows this format:
https://<request-endpoint-URI>sp=<permissions>sv=<SAS-version>sig=<signature>
- Add Azure Active Directory, OAuth, or other security.
- But also, by restricting incoming IP addresses
All of them are valid and all of them have advantages and disadvantages. The goal of this post is not to explain all of them or explaining the differences and how you can implement each one of them. Today I would like to address the last one: Restrict incoming IP addresses and describe step-by-step how you can use this capability to let only your API Management trigger the logic apps present in your subscription by specifying the incoming IP range settings in yours Logic Apps.
In fact, if you want to add more authorization protocols to your logic app, you should in did consider using Azure API Management, not only you can specify policies to control the access to your Logic App like:
- Limit call rate per subscription, per key and/or by IPs;
- Set usage quota by subscription and/or key;
- Check the HTTP header;
- Or Validate JWT;
It will also be able to expose a public or private endpoint for your logic app, which can then use Azure Active Directory, OAuth, certificate, or other security standards. Not to mention the fact that it will offer more additional features like a proper and live document you Logic App endpoint or additional monitoring capabilities.
How to restrict incoming IP addresses for a specific Logic App
Azure Logic Apps allow you to limit access to the inputs and outputs in your logic app’s run history so that only requests from specific IP address ranges can view that data. For example, to block anyone from accessing inputs and outputs, you can specify:
- an IP address range such as 192.168.1.73-192.168.1.100 (xxx.xxx.xxx.xxx-xxx.xxx.xxx.xxx).
- or a Classless Inter-Domain Routing (CIDR) format like 192.168.1.73/32 (xxx.xxx.xxx.xxx/xx)
Only a person with administrator permissions can remove this restriction, which provides the possibility for “just-in-time” access to your logic app’s data. You can specify the IP ranges to restrict either by using the Azure portal or in an Azure Resource Manager template that you use for logic app deployment.
What is CIDR?
For does who are not familiar whit CIDR, which stands for Classless Inter-Domain Routing, is an IP addressing scheme that improves the allocation of IP addresses. It was introduced in 1993 by the Internet Engineering Task Force in order to replace the old system based on classes A, B, and C.
A CIDR IP address looks like a normal IP address except that it ends with a slash followed by a number, called the IP network prefix and it encompasses several concepts:
- It is based on the variable-length subnet masking (VLSM) technique, which allows the specification of arbitrary-length prefixes.
- It introduced a new method of representation for IP addresses, now commonly known as CIDR notation, in which an address or routing prefix is written with a suffix indicating the number of bits of the prefix, such as 192.0.2.0/24 for IPv4, and 2001:db8::/32 for IPv6.
- A single IP address can be used to designate many unique IP addresses with CIDR.
And one huge advantage is that it will help reduce the size of routing tables and make more IP addresses available within organizations.
If you don’t know how to represent your desired CIDR notation, there are several tools (or normally called calculators) to convert IPv4 to CIDR like:
And these are simply two of them that I found in one simple research on search engines.
How to restrict incoming IP ranges for a Logic App to accept only APIM calls?
The first thing we need to know is the IP Address (or IP Address range) of our APIM. To do that we need to:
- Access to your APIM on the Azure Portal (old Publisher Portal that is now built-in inside the Azure Portal;
- And under the Overview option, on the top information you will find the IP Address specify on the “Virtual IP (VIP) addresses” property

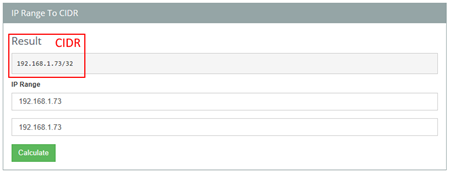
- The next step is to use one of the above tools to convert this IP Address in a CIDR notation, for example as you see in the bellow picture – assuming that we will limit access to only one IP;
Now that we know the IP Address and is CIDR notation equivalent. We need to:
- In the Azure portal, access to your Logic App.
- On your Logic App’s menu, under Settings, select Workflow settings.
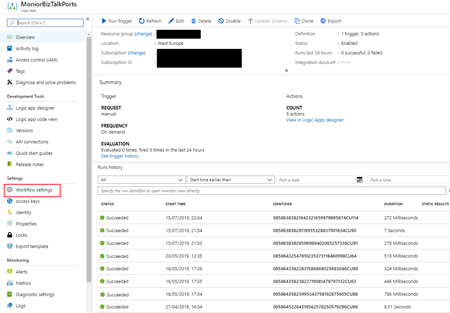
- Under Access control configuration > Allowed inbound IP addresses, select Specific IP ranges.

- Under IP ranges for triggers, specify the IP address ranges that the trigger accepts.
- A valid IP range uses these formats: x.x.x.x/x or x.x.x.x-x.x.x.x
- In our case, we will use the CIDR notation: 192.168.1.73/32

- And then click Save.
Testing the restrictions
This is the easy part. If you want to validate and test if these configurations/restrictions are working properly you can easily do this by for example:
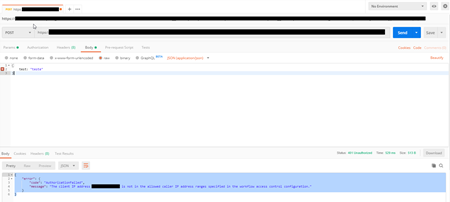
- Open Postman tool from your machine and try to invoke directly the Logic App;
- If everything works according, you should receive a 401 Unauthorized status with the following payload
{
   "error": {
          "code": "AuthorizationFailed",
          "message": "The client IP address '94.132.139.33' is not in the allowed caller IP address ranges specified in the workflow access control configuration."
   }
}
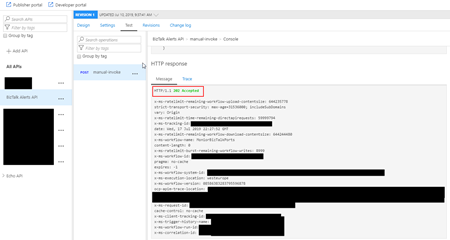
Now, if we try from our APIM, we should get a 202 Accepted status.
