Azure App Service is a platform as a service (PaaS) offering from Microsoft Azure that allows developers to quickly build, deploy, and scale web apps and APIs on Azure. Azure App Service is designed to be highly scalable, allowing you to easily scale your application to meet changing traffic demands. One of its most important features is auto-scaling, which allows your application to automatically adjust the number of instances it’s running based on changes in traffic or demand. This can help you optimize your application’s performance and cost-effectiveness while ensuring that it can handle any spikes in traffic or usage.
Azure App Service Scaling can be done in several ways,
- Scaling up (increasing the resources allocated to your application)
- Scaling out (adding more instances of your application)
- Autoscaling (automatically adjusting the number of instances based on traffic).
In this blog, we’ll discuss each of these scaling options in more detail and take a closer look at how auto-scaling works.
Scaling Up
Scaling up involves increasing the resources allocated to your application. This can be done by upgrading the pricing tier of your Azure App Service plan, which will provide more CPU, memory, and other resources to your application.
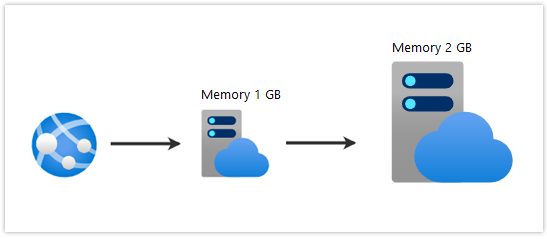
Scaling up your Azure App Service plan can improve the performance of your application by providing more resources, but it can also increase your costs. Make sure to monitor your usage and adjust your pricing tier accordingly.
Scaling Out
Scaling out involves adding more instances of your application. This can be done by increasing the number of app service instances in your App Service plan.
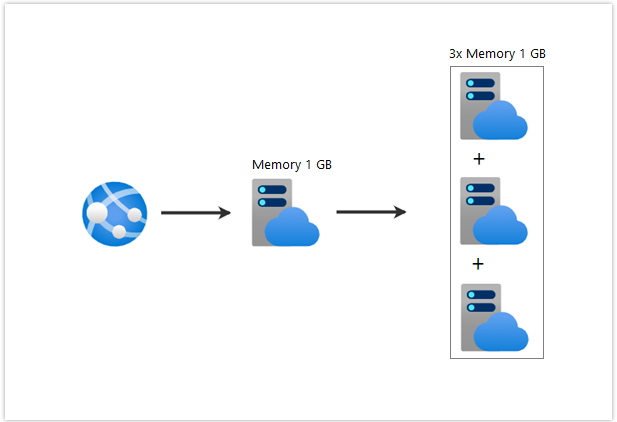
Scaling out your Azure App Service application improves the scalability and availability of your application by distributing the load across multiple instances. However, it can also increase your costs, so make sure to monitor your usage and adjust the number of instances accordingly.
What is Autoscaling?
Azure App Service Autoscaling allows you to automatically adjust the number of instances running your application, based on changes in traffic or demand. This means that you can add or remove instances as needed without having to intervene or make changes to your infrastructure manually.
Auto scaling is typically configured using metrics, which are values that are automatically collected and tracked by Azure App Service. These metrics can include things like CPU usage, memory usage, or network traffic, and they can be used to trigger scaling events when certain thresholds are reached.
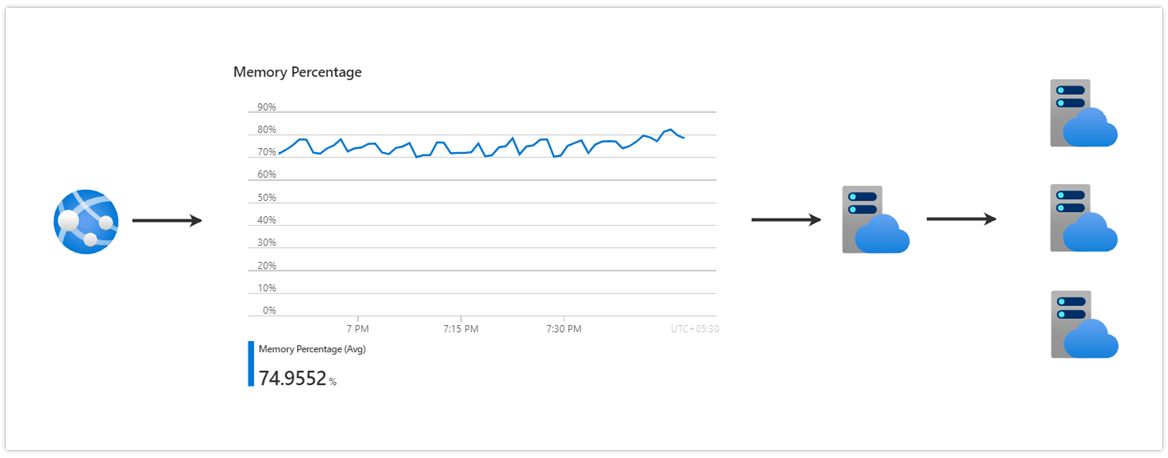
For example, you might configure your application to add an additional instance when CPU usage exceeds 80% or to remove an instance when CPU usage drops below 20%. By doing so, you can ensure that your application always has the resources it needs to handle incoming requests while avoiding unnecessary costs or resource usage.
Configuring Azure App Service Autoscaling
To configure Azure App Service Autoscaling, you’ll need to follow a few basic steps:
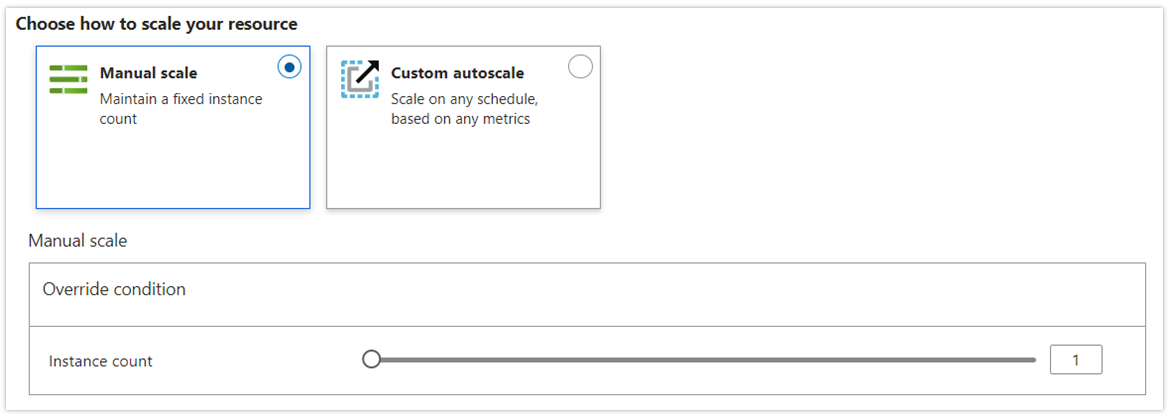
Choose your scaling mode
Azure App Service supports two primary scaling modes: manual and automatic. Manual scaling requires you to manually add or remove instances as needed, while automatic scaling relies on metrics and rules to add or remove instances based on demand automatically. For the purpose of this blog post, we’ll be focusing on automatic scaling, which will be available under the Scale-Out menu of the App service.
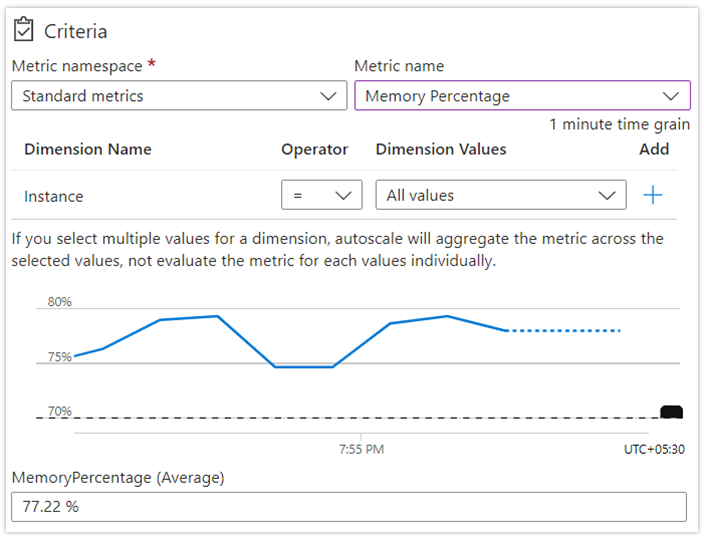
Choose your metrics
Next, you’ll need to choose the metrics that you want to use to trigger scaling events. You can choose from a variety of built-in metrics in Azure App Service, or you can create custom metrics based on your application’s specific needs.
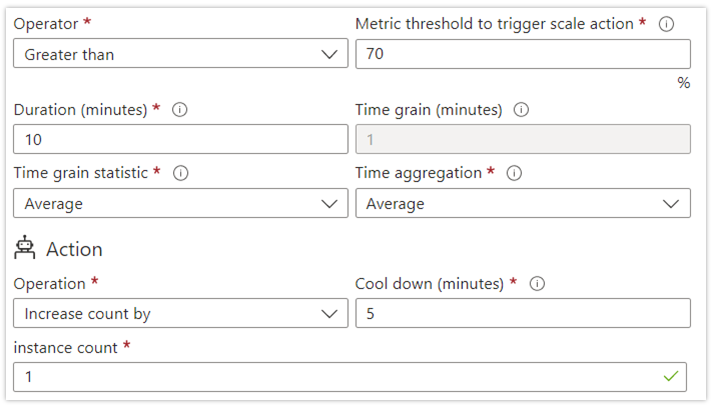
Configure your scaling rules
Once you’ve chosen your metrics, you’ll need to configure your scaling rules. Scaling rules are used to determine when to add or remove instances based on changes in the chosen metrics. For example, you might configure a scaling rule to add an instance when CPU usage exceeds 80%, or to remove an instance when CPU usage drops below 20%.
Test and validate your scaling configuration
Finally, you’ll need to test and validate your auto-scaling configuration to ensure that it’s working as expected. This might involve running load tests against your application or monitoring your metrics and scaling events over time to make sure that your rules are triggering correctly.
To conclude, Auto scaling is one of the Azure App Service Cost Optimization technique that can help you optimize your application’s performance and cost-effectiveness. By carefully configuring your auto-scaling rules, monitoring your metrics, and optimizing your application over time, you can ensure that your application is always running smoothly, efficiently, and cost-effectively.
Though auto-scaling ensures cost-efficiency, there is also a risk of spending over your budget as resources will be automatically added based on the amount of traffic or demand an application experiences.
This puts us in a situation to have a close eye on the cost spent, for which tools like Turbo360 can be used to set a predetermined budget and get alerted on cost spikes.
Here are a few features of Turbo360 Azure Cost Analyzer that can help you with Azure cost analysis and monitoring:
- Get to visualize the spending across multiple Azure Subscriptions.
- Auto-pause idle Azure App Service resources outside business hours.
- Generate cost reports with respect to teams, projects, etc.
- Visualize cost spending through custom dashboards.
- Eliminate cost overrun with deep visibility and continuous optimization.