The recently announced Azure App Service brings in capabilities from Azure Websites, Azure Mobile services, and Azure BizTalk services together into an integrated platform. Some of the existing offering like Azure Websites is renamed to Web apps and Mobile Services renamed to Mobile Apps. The announcement is definitely not just some restructuring/renaming gimmick, Microsoft brought a whole lot of new capabilities into Azure as part of Azure App Services, two of the notable ones are the new “Azure API apps” and “Azure Logic apps”.
What Are Azure API Apps?
At a very high-level API apps are nothing but any REST based service (web service) with additional metadata that explains clearly the various operations present. Microsoft adapts Swagger 2.0 as the default metadata definition language for the standard ASP.NET Web API projects along with Swashbuckle (an open source project that provides dynamic Swagger generation for Web API controllers). The customer can build API apps in any technology (Node.js, Java, .NET etc), as long as the metadata is clearly defined according to Swagger 2.0 definitions it will become an Azure API app.
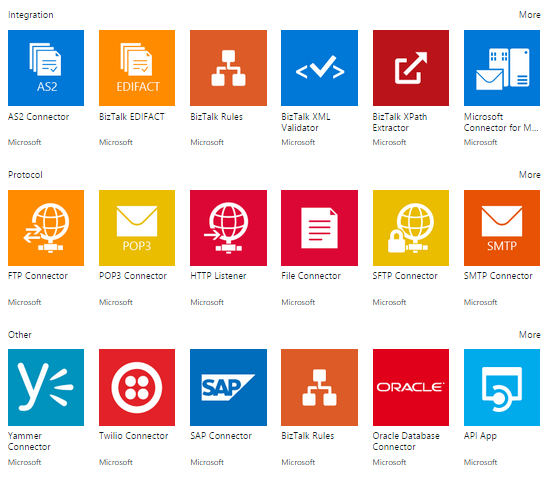
Microsoft out the box shipped a lot of Azure API Apps in the Azure marketplace during the launch (most of them are developed by BizTalk team) that helps to connect to numerous SaaS-based applications out there like Office365, Salesforce, Yammer, Twilio, etc. You can simply search by clicking on the “Market Place” within Azure portal
Azure API apps are sometimes also referred as “Connectors” since it acts like connection endpoints to external systems. Some of the connectors are capable of “Hybrid Connections”, meaning they are capable of running in customers on-premise environment and expose the on-premise systems seamlessly as Azure API apps. This is one of the exciting features, and one of the key feature that differential Azure’s offering from similar other offerings like IFTTT, Zappier etc.
Let’s take a deep look into “Hybrid Connectors”, with some example, how to setup, how to make it work, how to trouble shoot/diagnose connectivity issues etc.
Hello World Example Using File Connector
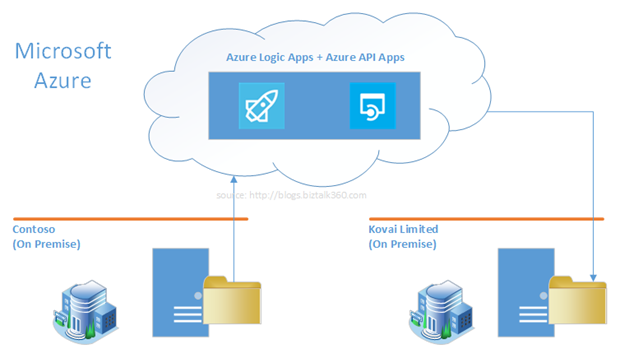
It’s a common tradition for people coming from BizTalk world to demonstrate the power of BizTalk by moving a file from folder A to folder B using the FILE adapter and slowly expanding on it. Let’s follow the same tradition here, but with a slight twist. Here is our requirement as shown in the below picture, Contoso limited places all their invoices in a local file system in one of their applications servers, which needs to be transmitted to Kovai Limited periodically,
In the past, if you wanted to build a system like this, it would have required lot of infrastructure work like SFTP, Managed File transfer, opening up ports/firewalls on both locations etc. But now with the help of Azure Logic App, Azure API App – File Connector (out of the box), you should be able to build this system within hours/days.
Now let’s dive into implementing this solution. If we simplify the requirement, it’s going to look like this
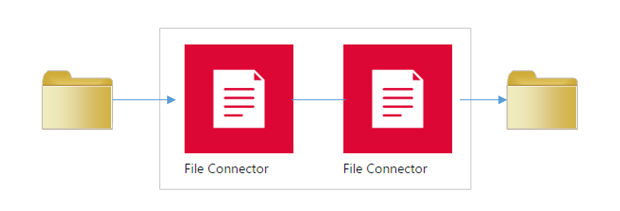
You need someone to receive the file from the source location and someone to transmit the file to the destination location. That someone in our case is the out of the “File Connector” in Azure. File Connectors are nothing but Azure API app, that’s been shipped by Microsoft. File connector is special, it’s a pure Hybrid connector and out of the box got the ability to talk to on-premise Folder locations after some basic configuration.
I’m assuming you are aware of the basic concepts like working with Azure Logic apps, how to use connectors, if this is your first time, take a look at Create a new logic app before continuing. It’s important to understand the concepts like Service Plans, Resource Group, Gateway etc, but it’s not required at this stage.
Configure File Connector
The very first thing we need to do is to create two instances of File Connector within our resource group, but before we configure File connectors we need to create two Azure Service Bus namespaces (1 for each file connector – locations) since it’s required for configuring file connector. File connector under the hood uses the Service Bus Relay technology to connect to the on-premise environment. It kind of work in a similar way how Azure Hybrid Connection works by abstracting all the connection complexities by providing an installable MSI file.
NOTE: One of the important thing to note here is, your Azure Service Bus subscription must be of “Standard” tier since the Service Bus relay is only available as part of the Standard tier. Also, you can create/manage service bus only using the old portal at this stage.

Once you have service bus connection string, configuring File connector is fairly straight forward, it only takes two parameters.
- Go to Azure Portal (a new one), Click on Browse > Market Place
- Start typing the word “File Con..” in the search box, and you’ll see an icon with the name “File Connector”
- Click File Connector, and then “Create” button in the next summary blade
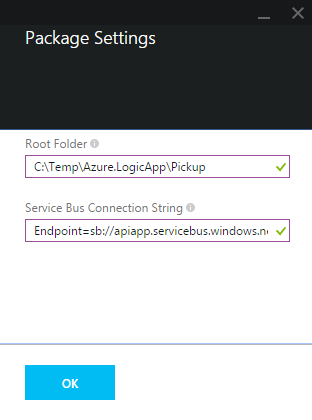
- On the File Connector blade, click on the “Package Setting” link,
- On the final screen, you need to specify the two important properties required for File connector
- Root Folder: This is the normal folder location (on-premise in the server), example: “C:\Temp\Azure.LogicApp\Pickup”
- Service Bus Connection String: Specify the connection string of your SB namespace (pick it from the old Azure portal).
Once you click the create button, it will take about a minute to provision the File connector (API App), before you can use it in your solution (Azure Logic App). You need to repeat the above steps to configure the second File connector to the destination location, but I’m going to cut short this example by using the same File connector but pointing to different folders within the same server.
Once the file connector is created, the blade will open automatically, if not you can open it by navigating to Browse>Api Apps>Your File Connector.
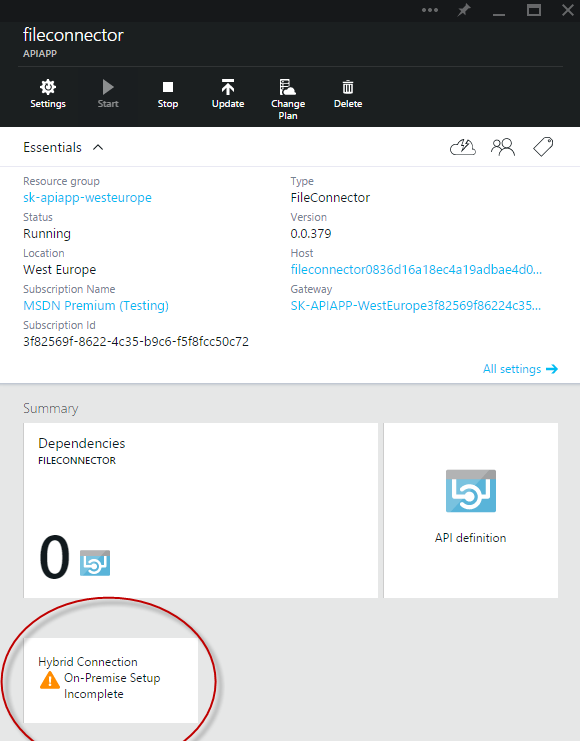
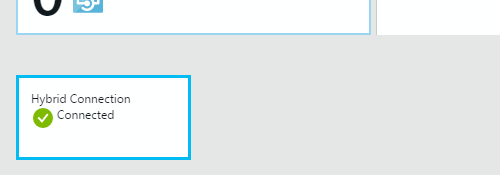
As you can notice there is a warning sign in the blade showing “Hybrid Connection – On Premise Setup Incomplete”, just click on that box, which will open up “Hybrid Connection” blade. You will see a link labeled ON-PREMISES HYBRID CONNECTION MANAGER “Download and Configure”, clicking on that will download the on-premise agent file. Copy that file to the server where you’ll have your folder location, and start installing it (internet connection is required of course), the installer will ask for service bus relay connection string as shown below
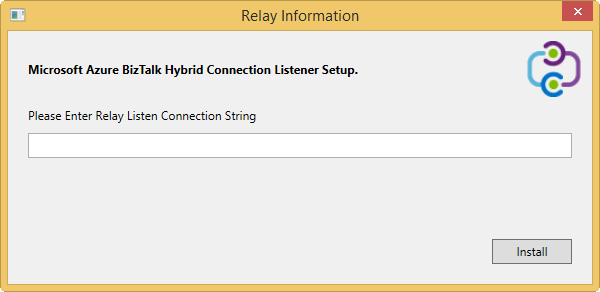
You can get that information from “Hybrid Connection” blade as shown below
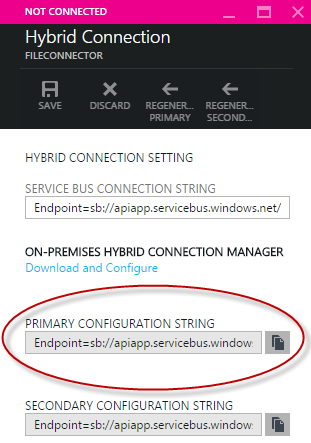
Once you provide that information and completed the installation procedure, leave few seconds and check back on the File Connector blade, it should now show the connection successfully established as shown below.
Creating The Azure Logical App
At this stage we have done the groundwork of creating all the building blocks, now let’s just get stitch all of them together with the Azure Logical app.
Click the + link (at bottom left corner) in the portal, and follow the path as shown below
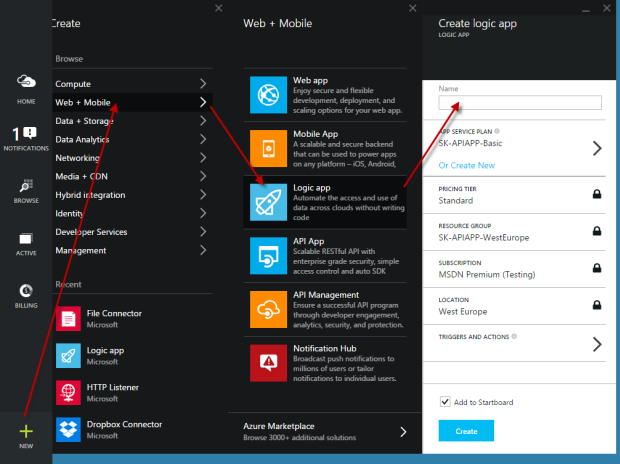
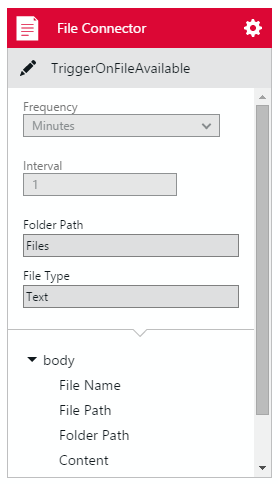
Let’s name the logical app to “contoso-to-kovai-invoice-submit” and click on the “Triggers and Actions” link, which will open the design canvas. On the RHS you’ll see the File connector API app we just created earlier, just click on it. You’ll see a trigger called “TriggerOnFileAvailable”, select the frequency and interval (you need to be on standard plan to choose low values like minutes), and specify the Folder Path. This is the tricky bit and took a while to figure out, you just need to specify the folder name under the root folder name you configured while creating the File Connector (API App). So in my case, the pickup folder is “C:\Temp\Azure.LogicApp\Pickup\Files” (i.e Rootfolder + Files) leave the rest of the configuration to default.
Now we configured the source location, the next step is to configure the destination. For this click on the “File Connector” again, this time you’ll see bit more options (basically it’s showing the actions part, instead of triggers), pick up “Upload File” and configure it as shown below.
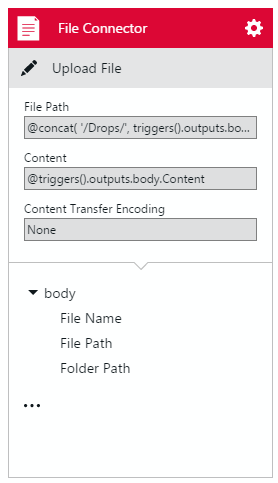
For the content just select the body content from the previous connector, when you click on the “…” button next to Content text box it will show the available options, you select “TriggerOnFileAvailable Content” from the drop-down. Save the Logic App (by pressing the save button) and close the designer.
The important (tricky) thing here is configuring the File Path, it must be configured like this
@concat( ‘/Drops/’, triggers().outputs.body.FileName)
meaning you are concatenating the output folder “Drops” with the source file name. Once it’s all set up, you can then just go and drop the files in the pickup folder, and let it run, you’ll notice the files being picked up and appearing on the destination folder. The file will automatically get deleted from the source folder, once it’s successfully picked up.
Do Not Use “Run Now” For Trigger Based Logic Apps
This one got me stuck for a while, do not use the “Run Now” functionality (available in the Logic App blade), because the trigger won’t get fired and you’ll end up with empty data resulting in errors like this
{“code”:”InvalidTemplate”,”message”:”Unable to process template language expressions for action ‘fileconnector0’ at line ‘1’ and column ’11’: ‘Template language expression can not be evaluated: the property ‘outputs’ can not be selected.’.”}
Large Message Handling
One of the challenges we can spot in this new architecture is it’s more inclined with web technologies like HTTP, REST etc which are stateless and not good at streaming end to end. We can clearly see the issue here in our example, when I tried to upload a 5mb file, it clearly threw the exception **Exception thrown:\r\nExceptionType=System.Web.HttpException, Message=Maximum request length exceeded. BizTalk would have handled it nicely without a glitch due to its advanced streaming support end-to-end.